
More Pan Fitting
04/28/10 16:25 Filed in: All
I pulled the wood doubler out from between the collective pocket and the edge of the seat pan. I don't really know what it was supposed to do, but judging by how easily I was able to tear it out, not much. It was clearly glassed in as a secondary operation and an afterthought. If there is clearance after the seatpan is fit, I may glass in a layer just for peace of mind.
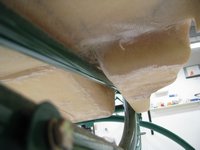 You can see that the pan drops much further down on the left side now. So much so that instead of being canted to the right on the frame, it is now canted to the left. However, that single modification of removing that wooden piece allowed the seat pan to "nest-in" much better, and the clearance between the pan and the mounting tabs is now less than 1/4 inch all around. With my floxed pads and very, very minor bending, this will be a clean fit (my prediction).
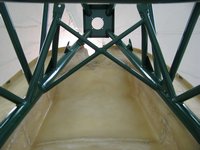 This view is looking up from the bottom at the back of the seat pan. You can see now that the seat is offset to the left. I am discovering the limitations of the "video" approach, instead of a manual and blueprints. I would very much like to know the exact offset of the control rod clearance tunnel at the top of the seat pan relative to the hood bracket at the top of the frame. You really have to watch BJ closely. As far as I can tell, he only mentions in one brief sentence, much later on, that the hump is intended to be aligned with the hole at the top of the frame, and the seat pan edges are centered relative to the frame tubes.
Of course with some prints and a manual this would all be immediately evident. Instead you have to watch the same video over and over (drives my daughter nuts) to try to glean this.
Perhaps I just got spoiled with the Van's RV8A kit, which has great documentation by comparison. Now don't get me wrong, I am immensely impressed with the Helicycle kit so far. For the money spent, the frame, fiberglass, materials, and especially the machined parts appear to be of very high quality. The budget was spent on machining parts and tooling, and not on documentation.
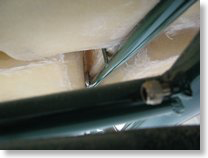
The source of the misalignment are the vertical tabs next to the collective pocket. Looks like those have to be bent inward a hair.
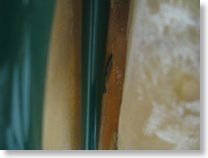
One thing I do not like about the fiberglass is the appearance of the bottom surface. The whitish areas almost appear as if they weren't wetted out fully. When I get my epoxy I will probably brush on a thin coat to "seal" them. It doesn't look to be a structural issue, but certainly a cosmetic one that bothers me.
I looked ahead in the videos to the next step, which is the instrument pod mounting. I did not get the 12 inch long 3/8" drill bit when I picked up the kit, so I'll probably have to order one. I must admit that the "jiggle and elongate the holes" approach does not excite me. I'm pretty sure there must be some sort of clamping arrangement that can be constructed to more precisely achieve the same effect. I don't like the idea of elongating the holes, then tightening the bolts to hold it all in place. Once again, I will consult Tim Drnec's and Juan R's sites to see what they did. Those two guys really set a high bar when it comes to fastidiousness and quality workmanship. While I want a straight, true, clean, and reliable ship, I doubt that I will be able to meet their standards of excellence.
Of course with some prints and a manual this would all be immediately evident. Instead you have to watch the same video over and over (drives my daughter nuts) to try to glean this.
Perhaps I just got spoiled with the Van's RV8A kit, which has great documentation by comparison. Now don't get me wrong, I am immensely impressed with the Helicycle kit so far. For the money spent, the frame, fiberglass, materials, and especially the machined parts appear to be of very high quality. The budget was spent on machining parts and tooling, and not on documentation.
The source of the misalignment are the vertical tabs next to the collective pocket. Looks like those have to be bent inward a hair.
One thing I do not like about the fiberglass is the appearance of the bottom surface. The whitish areas almost appear as if they weren't wetted out fully. When I get my epoxy I will probably brush on a thin coat to "seal" them. It doesn't look to be a structural issue, but certainly a cosmetic one that bothers me.
I looked ahead in the videos to the next step, which is the instrument pod mounting. I did not get the 12 inch long 3/8" drill bit when I picked up the kit, so I'll probably have to order one. I must admit that the "jiggle and elongate the holes" approach does not excite me. I'm pretty sure there must be some sort of clamping arrangement that can be constructed to more precisely achieve the same effect. I don't like the idea of elongating the holes, then tightening the bolts to hold it all in place. Once again, I will consult Tim Drnec's and Juan R's sites to see what they did. Those two guys really set a high bar when it comes to fastidiousness and quality workmanship. While I want a straight, true, clean, and reliable ship, I doubt that I will be able to meet their standards of excellence.