
Pan Fitting
04/24/10 21:35 Filed in: All
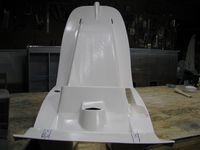
Fitting seat pan. Cleaned up holes and edges. Mounted nutplates (with flush rivets, instead of the pop rivets), and started trying to fit the pan to the frame. The fit is tricky. A lot more material than I would have thought had to be removed from the outsides of the front of the footwells. Lots of small trimming, then refitting of the pan.
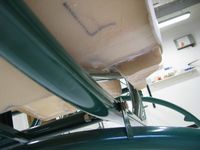
As can be seen below, a fair amount of material has to come off both sides of the front of the footwells to fit down between the two front frame tubes. The fiberglass is at least doubled up here around the bends, so hopefully the strength is not compromised too much. We shall see as this will probably be a high stress area in getting in and out of the ship.
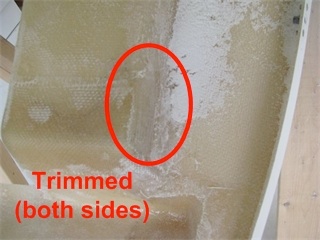
As can be seen below, a fair amount of material has to come off both sides of the front of the footwells to fit down between the two front frame tubes. The fiberglass is at least doubled up here around the bends, so hopefully the strength is not compromised too much. We shall see as this will probably be a high stress area in getting in and out of the ship.

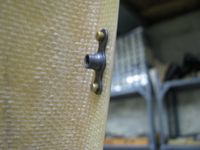
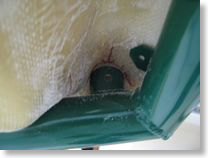
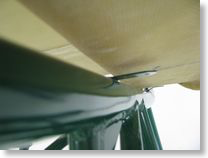
Shown here is the grinding I had to do on the control bracket to clear the seat pan as specified in the video. Still seems to be plenty of meat between the hole and the ground edge. There's about 1/16 of an inch clearance between it and the seat pan. I DO plan on repainting the frame after all the preliminaries are done just prior to final assembly. Green - what was he thinking?
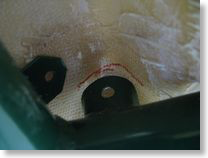
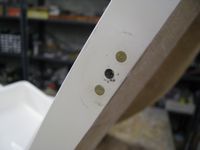
Here are the control tube mount tab locations when the front of the pan is flush against the mounting tabs. Pretty tight. I am going to shave a little off the inside of the round to fit the front plane of the pan down a hair lower.
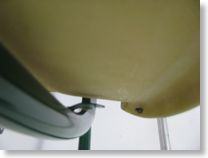
 Aft of the front two holes, the fit is not good. There is a large gap between the floor pan and the seat back. I am not sure I want to, or even could, bend the tabs enough to close the gap. Also, the seat pan is canted to the right. The right cant seems to be partially due to the frame first hitting the wooden reinforcing rod that is laminated alongside the collective pocket. I noticed on Tim Drnec's site that he just removed this piece, and I may do so too. It is kind of sloppily glassed in there. Tim glassed in anchor nuts to the rear of the seat back for a nice flush, no penetration, mount of the pan. Though I doubt I will go to that extreme, I do think I will build up the areas immediately underneath the mounting tabs with flox and resin to bulk up the mounting points. Though it's more work, I think it will beef up the fiberglass under the mounting points, which seemed a little weak with just a hole through that thin layer of fiberglass.

 I placed my first order to Aircraft Spruce for this project to get some fresh epoxy and flox for this procedure. Prior to executing this mod I also need to better jig the seat pan to the frame, especially in the rear before drilling any holes. There is quite a bit of side-side flex on the pan and I want to get it leveled and centered perfectly since the cabin mounts to the pan and presumably any errors will be magnified from that point onward. Perhaps I am seeming overly anal about this, but I want to be as precise as possible since this is a sophisticated and complex mechanical beast. In airplane construction there appears to be a little more wiggle room. Not so with helicopters. Precision matters.
As can be seen below, a fair amount of material has to come off both sides of the front of the footwells to fit down between the two front frame tubes. The fiberglass is at least doubled up here around the bends, so hopefully the strength is not compromised too much. We shall see as this will probably be a high stress area in getting in and out of the ship.
As can be seen below, a fair amount of material has to come off both sides of the front of the footwells to fit down between the two front frame tubes. The fiberglass is at least doubled up here around the bends, so hopefully the strength is not compromised too much. We shall see as this will probably be a high stress area in getting in and out of the ship.
Shown here is the grinding I had to do on the control bracket to clear the seat pan as specified in the video. Still seems to be plenty of meat between the hole and the ground edge. There's about 1/16 of an inch clearance between it and the seat pan. I DO plan on repainting the frame after all the preliminaries are done just prior to final assembly. Green - what was he thinking?
Here are the control tube mount tab locations when the front of the pan is flush against the mounting tabs. Pretty tight. I am going to shave a little off the inside of the round to fit the front plane of the pan down a hair lower.